Cloud Source Repositories を使ってソース管理するところまで
Cloud Source Repositories とは?
現在Google App Engineを含むGoogle Cloud PlaftormにはPrivateに使用できるリポジトリ(Cloud Source Repositories)が用意されています。
https://cloud.google.com/source-repositories/docs/
・複数のプライベートリポジトリが作成できる
・GitHubなどと共有できる
・ブラウザ上でソースの編集ができる
・今のところある程度までなら無料
などなかなか魅力的です
これを使ってソースコードの管理を行います
Cloud Source Repositories を使用してみる
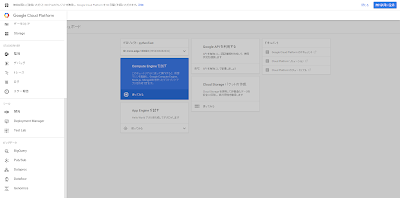
左上の3本の横棒(何て言うんだろう?)クリック → 開発
ちなみにカーソルを載せた時に表示されるピンマークをクリックするとピン留めされます。便利
ソースコード → 開始 をクリック
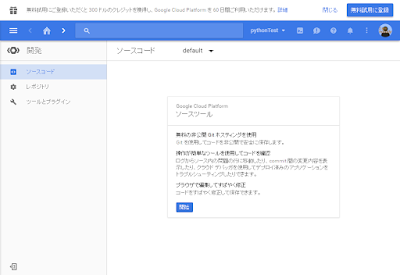
3通りの方法でソース管理ができます
1.GitHub または Bitbucket からの自動ミラーリング
GitHubなどからソースを取得・共有します
2.ローカル Git レポジトリから Cloud レポジトリへのコードの push
ローカルに作成してあるプロジェクトを持ってきます。今回はこれ
3.ローカル Git レポジトリへの Cloud レポジトリのクローン作成
現在のCloudリポジトリをローカルへ持ってきます(今は空だけどね)
丁寧に手順が書かれていますがそのまま手順に沿って行くと多分ハマります(gitに詳しい人はそうでもないかも)
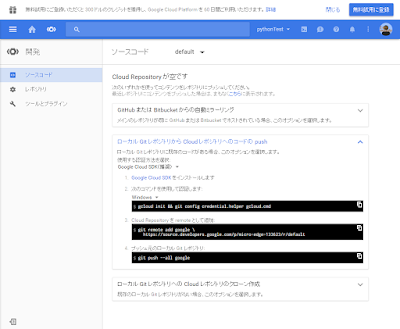
Google Cloud SDK をインストールします
https://cloud.google.com/sdk/
Google Cloud SDK Shell を起動します
次のコマンド
gcloud init && git config credential.helper gcloud.cmd
で認証します途中使用する設定、使用するアカウント、対象のプロジェクトなどが聞かれるかもしれないので対象の数値を入力してEnterを押します
Pick configuration to use:
[1] Re-initialize this configuration [default] with new settings
[2] Create a new configuration
Please enter your numeric choice: 1
Your current configuration has been set to: [default]
Pick cloud project to use:
[1] [laboratory-1306]
[2] [micro-edge-133623]
[3] [vibrant-works-130611]
Please enter your numeric choice: 2
Your current project has been set to: [micro-edge-133623].
ローカルプロジェクトからローカルリポジトリを作成します
この辺はお好みで(今回はTortoize Gitで作成)
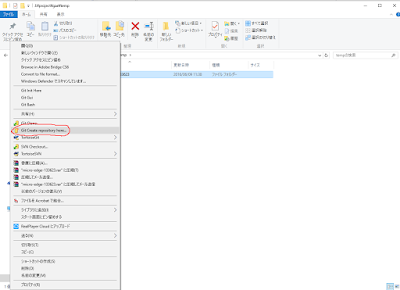
ローカルに.gitファイルが作成されていればOK
知っている人なら当たり前のことかもしれませんがリモートのリポジトリへプッシュするためにはコミットする必要があります(ここで数時間ハマったのは内緒)
右クリック → Git Committ
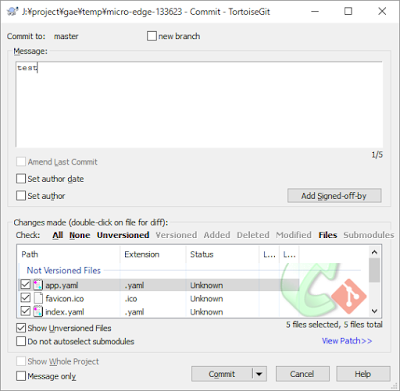
Shellへ戻ってプロジェクトフォルダ(.gitがあるパス)へ移動
C:\Users\xxxx\AppData\Local\Google\Cloud SDK\default>cd /d J:\project\gae\temp\micro-edge-133623
Cloud Repository を remote として追加(そのままコピー・ペーストすると改行が入ってしまうので注意!!)
git remote add test https://source.developers.google.com/p/micro-edge-133623/r/default
testのところは割となんでもいいです
URLのエイリアスみたいなものなので
プッシュ
git push --all test
成功した場合以下のように表示されます
J:\project\gae\temp\micro-edge-133623>git push --all default
Counting objects: 7, done.
Delta compression using up to 8 threads.
Compressing objects: 100% (7/7), done.
Writing objects: 100% (7/7), 3.31 KiB | 0 bytes/s, done.
Total 7 (delta 0), reused 0 (delta 0)
remote: Storing objects: 100% (7/7), done.
remote: Processing commits: 100% (1/1), done.
To https://source.developers.google.com/p/micro-edge-133623/r/default
* [new branch] master -> master
以上
これでソース管理は可能かと
Cloud Source Repositoriesがそのうち有料化される可能性もあるけどまあその時はその時で
続き
https://trueman-developer.blogspot.jp/2016/06/google-app-engine-python-windows_11.html
少しとっちらかってしまったので、Eclipse(Pleiades)で開発工程を一本化してやりたいなと思います
ここまででやってきた面倒な手順がいくつかなくなったりします