この記事みるよりhttps://firebase.google.com/docs/ を見たほうがいいです(身も蓋もない)
2016-12-12 : 通知取得時の通知内容(titlteやbodyなど)を取得する方法が見当たらなかったので追記
2016-12-22 : FirebaseへのAPNs証明書がハマりそうだったので追記
2017-01-18 : 通知が届かないケースがあったため追記
Firebase について
- iOS,Android,Webの通知機能が実装できる
- 単純なテキスト通知だけでなくカスタムデータの設定や投稿日時の指定ができる
- 通知日時などのログが後から確認できる
- 通知送信数や既読数が確認できる
- 全体、あらかじめ設定したトピック単位、特定の端末へ通知を送信できる
- 通知機能だけなら $0 / month
- サーバサイドプログラムからPush通知が実行できるらしく大体の要望には答えられる模様
Firebase 利用前の事前準備
事前に証明書.p12 を書き出す必要あり
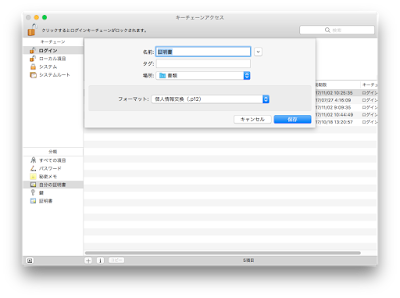
前回の記事 http://trueman-developer.blogspot.com/2016/11/iosphpswift3.htmlを参照のこと
正直 https://firebase.google.com/docs/cloud-messaging/ios/certs の方が丁寧・正確なのでなんとも言えない
ざっくり説明すると
MacOS上でCSR作成
→ https://developer.apple.com/account/ios/identifier/bundle よりAppID作成(Push Notifications を有効にすること)
→ 作成したApp ID からEdit → Create Certificate... → CSRをアップロードして証明書ダウンロード
→ ダブルクリックしてキーチェーンアクセスに登録した後右クリックから書き出し(コマンドからでもいける?)
秘密鍵は不要なので注意
パスワードは入力不要
Firebase プロジェクト作成から組み込み、動作確認まで
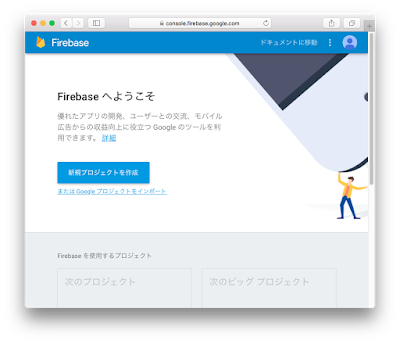
https://console.firebase.google.com/ へアクセス
?を押せば丁寧な説明が表示される
正直ハマりポイントはないはず
iOS アプリ向けにに Firebaseプロジェクトを作成する
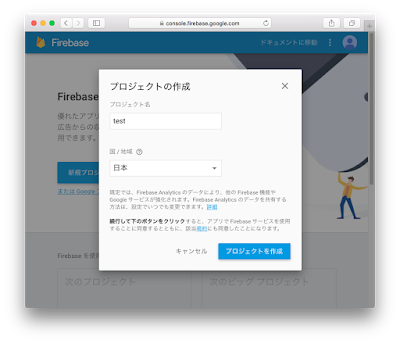
プロジェクト名
適宜設定する
国 / 地域
Firebaseが動作する場所とは関係なく通貨単位などが設定されるらしい。
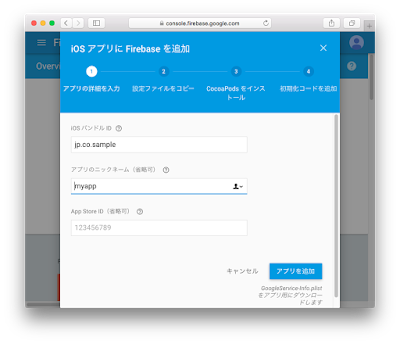
iOSバンドルID
iOSアプリのBundleIDと合わせること
アプリのニックネーム(省略可)
Firebase上での識別名
App Store ID(省略可)
アプリ公開後の話になってくるので基本省略することになるかと
初回のみ手順が表示される。
軽く手順を確認しながら進める(一旦閉じないと2番目以降の作業ができない)
GoogleService-Info.plist をプロジェクトへ追加する
ハンバーガーアイコンだっけ?(アプリ名の右の...)をクリック → 管理
→ 全般タブ → GoogleService-info.plist からダウンロード → プロジェクトに追加
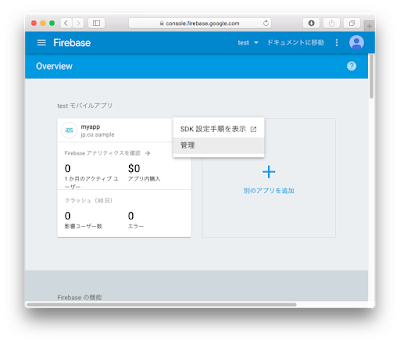
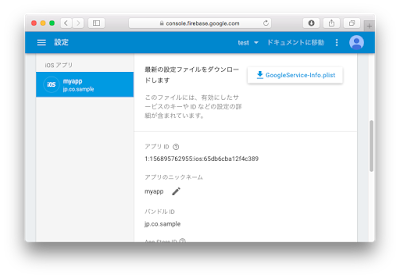
ハンバーガーアイコン?(アプリ名の右の...)をクリック → 管理
→ クラウドメッセージングタブ → 証明書をアップロード → 証明書.p12をアップロード
証明書.p12 はキーチェーンアクセスから種類が証明書のものを1つ書き出すこと(Firebaseのドキュメントではなぜか秘密鍵と記述されている)
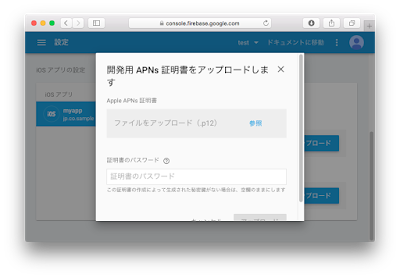
Firebase/Core と Firebase/Messaging をインストール
Cocoa Podsを使用する。プロジェクトディレクトリで
pod init
作成されたPodfileを編集する。
Push通知を利用する場合は
pod ‘Firebase/Core’
pod 'Firebase/Messaging'
を追加することpod 'Firebase/Messaging'
大体以下のようになる。
# Uncomment this line to define a global platform for your project
# platform :ios, '9.0'
target 'webViewTest' do
# Comment this line if you're not using Swift and don't want to use dynamic frameworks
use_frameworks!
# Pods for webViewTest
pod ‘Firebase/Core’
pod 'Firebase/Messaging'
target 'webViewTestTests' do
inherit! :search_paths
# Pods for testing
end
target 'webViewTestUITests' do
inherit! :search_paths
# Pods for testing
end
end
編集が完了したら一旦Xcodeを終了して
pod install
Cocoa Pods についての詳細は http://trueman-developer.blogspot.com/2016/10/cocoapodsios.html
Cocoa Pods をどうしても使いたくない人は
https://dl.google.com/firebase/sdk/ios/3_2_0/Firebase.zip
からダウンロードしてきてREADMEを参考にプロジェクトへ組み込む
iOS側の実装
プロジェクトを開いてAppDelegate.Swift へ以下を記述する言語はSwift3
import UIKit
import UserNotifications
import Firebase


@UIApplicationMain
class AppDelegate: UIResponder, UIApplicationDelegate {

    var window: UIWindow?

    func application(_ application: UIApplication,
                     didFinishLaunchingWithOptions launchOptions: [UIApplicationLaunchOptionsKey: Any]?) -> Bool {
        // Override point for customization after application launch.

        // 通知許可を求める 適切なタイミングで呼ぶこと
        let apnsTypes : UIUserNotificationType = [.badge, .sound, .alert]
        let notiSettings = UIUserNotificationSettings(types: apnsTypes, categories: nil)
        application.registerUserNotificationSettings(notiSettings)
        application.registerForRemoteNotifications()

        FIRApp.configure()
        NotificationCenter.default.addObserver(
            self,
            selector: #selector(self.tokenRefreshNotification),
            name: NSNotification.Name.firInstanceIDTokenRefresh,
            object: nil)

        if let refreshedToken = FIRInstanceID.instanceID().token() {
            print("InstanceID token: \(refreshedToken)")
            connectToFcm()
        }

        return true
    }

    func application(_ application: UIApplication,
                     didRegister notificationSettings: UIUserNotificationSettings) {
        if notificationSettings.types != .none {
            application.registerForRemoteNotifications()
        }
    }

    // デバイストークン取得時の処理
    func application(_ application: UIApplication,
                     didRegisterForRemoteNotificationsWithDeviceToken deviceToken: Data) {

        let tokenText = deviceToken.map { String(format: "%.2hhx", $0) }.joined()
        print("deviceToken = \(tokenText)")
        FIRInstanceID.instanceID().setAPNSToken(deviceToken, type: FIRInstanceIDAPNSTokenType.sandbox)
        //FIRInstanceID.instanceID().setAPNSToken(deviceToken, type: FIRInstanceIDAPNSTokenType.unknown)
    }

    func tokenRefreshNotification(_ notification: Notification) {
        if let refreshedToken = FIRInstanceID.instanceID().token() {
            print("InstanceID token: \(refreshedToken)")
        }
        // Connect to FCM since connection may have failed when attempted before having a token.
        connectToFcm()
    }

    func tokenRefreshNotification(_ notification: Notification) {
        if let refreshedToken = FIRInstanceID.instanceID().token() {
            print("InstanceID token: \(refreshedToken)")
        }
        // Connect to FCM since connection may have failed when attempted before having a token.
        connectToFcm()
    }

    func connectToFcm() {
        FIRMessaging.messaging().connect { (error) in
            if error != nil {
                print("Unable to connect with FCM. \(error)")
            } else {
                print("Connected to FCM.")
            }
        }
    }

    // 通知取得時処理
    func application(_ application: UIApplication,
                     didReceiveRemoteNotification userInfo: [AnyHashable : Any],
                     fetchCompletionHandler completionHandler: @escaping (UIBackgroundFetchResult) -> Void) {
        print(userInfo)

        // 通知内容の詳細を取得
        let aps = userInfo["aps"] as? NSDictionary
        let alert = aps?["alert"] as? NSDictionary
        let title = userInfo["title"] as? String
        let body = userInfo["body"] as? String
    }
Firebaseの管理画面からpush通知を送る
Firebaseからプッシュ通知を送る
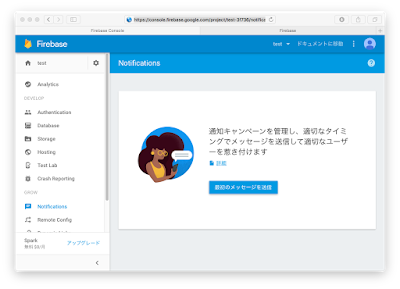
https://console.firebase.google.com/project/[プロジェクト名]/notification を開く
→ 最初のメッセージを送信
メッセージ文:通知画面に表示される
メッセージラベル:ソースないで利用する
配信日:1ヶ月後まで指定可能
ターゲット:ユーザーセグメント
アプリ:送信対象のBundle ID を指定
→ メッセージを送信
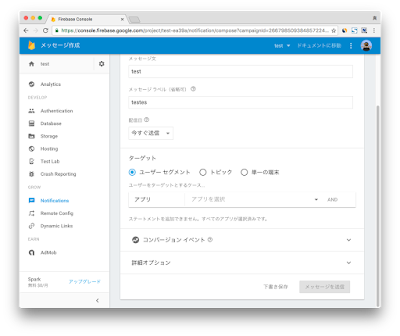
プロジェクト名とメッセージ文が表示される。

アプリ起動中は通知に表示されない模様、起動中なんだからアプリ上でどうにかしろという設計思想?
HTTP通信を用いてFirebaseからpush通知を送る
https://firebase.google.com/docs/cloud-messaging/serverFirebase Cloud Messagingというらしい
URL https://fcm.googleapis.com/fcm/send に対して
ヘッダ
Authorization: key=[サーバキー]
Content-Type: application/json
を指定してContent-Type: application/json
json形式で
{
"to": [モバイルインスタンスID],
"priority":"high",
"notification":
{
"title": "title", "body": "body"
}
}
をpostすると通知が飛ぶ。"to": [モバイルインスタンスID],
"priority":"high",
"notification":
{
"title": "title", "body": "body"
}
}
サーバキーは管理画面から確認可能。

モバイルインスタンスIDはiOSよりtokenRefreshNotificationで取得可能。
デバイストークンとは別物なので注意
以下のコマンドでプッシュ通知を送信可能
curl --header "Authorization: key=[サーバキー]" --header "Content-Type:application/json" https://fcm.googleapis.com/fcm/send -d "{\"to\": \"[モバイルインスタンスID]\",\"priority\":\"high\",\"notification\": {\"title\": \"title\", \"body\": \"body\"}}"
priorityをhighにしておかないとバックグラウンドへ行った時に通知が届かない。
現時点では画面から通知する場合と使用可能な機能が違うので注意(例えば全体に通知や言語ごとに通知などは出来ない)
以降もう少し詳しい話は https://firebase.google.com/docs/ を参照されたし
but you still need to add "remote-notification" to the list of your supported UIBackgroundModes in your Info.plist
iOS9以降?
TARGET → [Project] → Capabilities → Background Modes をON → Remote notifications にチェック
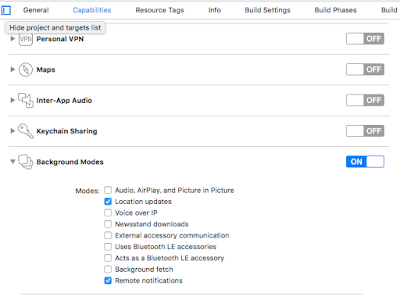
これをやっておかないとアプリケーションを完全に終了させたとき通知が届かなくなる?
その他の情報
mBaasのFirebaseの機能と料金体系についてざっくり調べてみた