ios版はこちら
Firebase について
- iOS,Android,Webの通知機能が実装できる
- 単純なテキスト通知だけでなくカスタムデータの設定や投稿日時の指定ができる
- 通知日時などのログが後から確認できる
- 通知送信数や既読数が確認できる
- 全体、あらかじめ設定したトピック単位、特定の端末へ通知を送信できる
- 通知機能だけなら $0 / month
- サーバサイドプログラムからPush通知が実行できるらしく大体の要望には答えられる模様
Firebase プロジェクトの作成
https://console.firebase.google.com
へアクセスします。
今回はすでにiOSアプリ用に作成したものとして進めていきます。
完全新規の場合は 新規プロジェクトの作成から(Android Studioからも作成できます)
設定 → 全般から
アプリを追加ボタンをクリックします。(プロジェクトのトップページからでもいける)
Android アプリにFirebase を追加 を選択します。
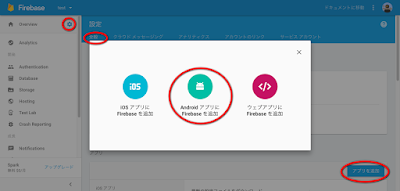
Web上で設定する方法とAndroid Studio上で設定する方法がありますがAndroid Studio上でやります。×ボタンを押してウィンドウを閉じます。
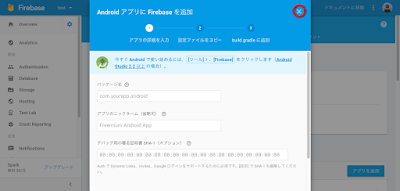
Androidへfirebase-messagingの組み込み
mdroid Studio から Tool → Firebase を選択します。
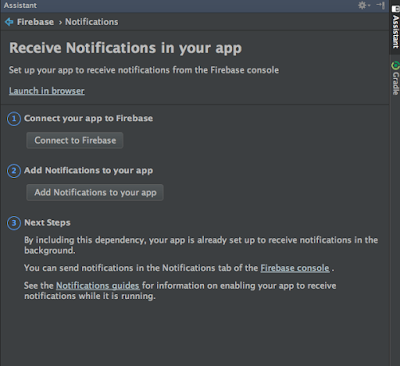
Assistant 画面が表示されるので Notifications → Receive Notifications in your app をクリックします。
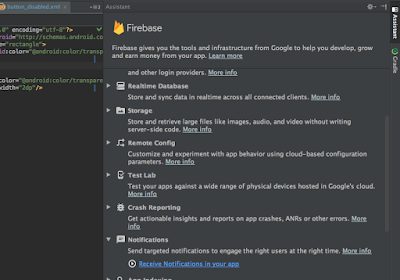
① Connect to Firebase をクリックします。
ブラウザが立ち上がりいろいろな許可を求められるので許可して次に進めます。
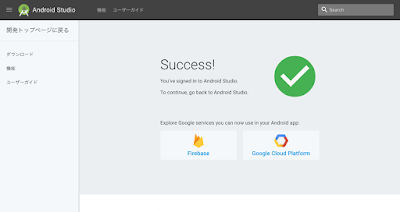
以下の画面のようにSuccessと表示されたら成功です。
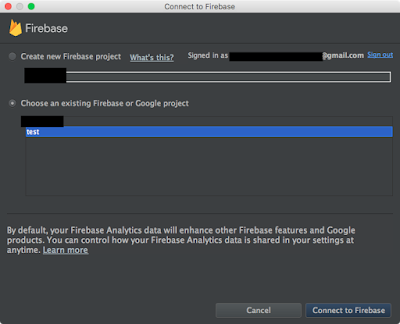
Android Studio へ戻ると Connect to Firebase という画面が立ち上がります。
ここから Create new Firebase Project を選択してFirebaseのプロジェクトが作成できるようです。
今回はすでにプロジェクトを作成済みなので、
Choose an existing Firebase or Google project
から該当するプロジェクトを選択して Connect to Firebase をクリックします。
①がConnected になっているので②のアプリケーションへ通知機能の追加を行います。
Add Notifications to you app
をクリックします。
build.gradleを書き換えるか聞かれるので Accept Change をクリックします。
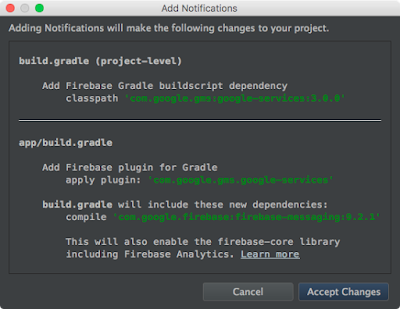
しばらく待っていると自動で設定してくれます。
うまくいかない場合以下を確認してみてください
・プロジェクトディレクトリ以下にgoogle-services.jsonがあるか。ない場合はhttps://console.firebase.google.com/ から該当するファイルをダウンロードする。
・build.gradle(Project)のdependencies にclasspath 'com.google.gms:google-services:3.0.0' が追記されているか
・build.gradle(app)のdependencies にcompile 'com.google.firebase:firebase-messaging:10.0.1' が追記されているか
・build.gradle(app)の末尾に apply plugin: 'com.google.gms.google-services' が追加されているか
通知処理の実装
https://codelabs.developers.google.com/codelabs/firebase-android/#9
https://firebase.google.com/docs/cloud-messaging/android/client
https://github.com/firebase/quickstart-android/tree/master/messaging
あたりを参考にプロジェクトへ組み込みます。
ざっくり説明すると通知を受信するためのサービスを作成して、AndroidManifestへ追加します。
https://github.com/firebase/quickstart-android/tree/master/messaging/app/src/main/java/com/google/firebase/quickstart/fcm
から
MyFirebaseInstanceIDService.java と
MyFirebaseMessagingService.java を持ってきて若干手直しします。
MyFirebaseInstanceIDService.java
/**
 * Copyright 2016 Google Inc. All Rights Reserved.
 *
 * Licensed under the Apache License, Version 2.0 (the "License");
 * you may not use this file except in compliance with the License.
 * You may obtain a copy of the License at
 *
 * http://www.apache.org/licenses/LICENSE-2.0
 *
 * Unless required by applicable law or agreed to in writing, software
 * distributed under the License is distributed on an "AS IS" BASIS,
 * WITHOUT WARRANTIES OR CONDITIONS OF ANY KIND, either express or implied.
 * See the License for the specific language governing permissions and
 * limitations under the License.
 */

package com.google.firebase.quickstart.fcm;

import android.util.Log;

import com.google.firebase.iid.FirebaseInstanceId;
import com.google.firebase.iid.FirebaseInstanceIdService;


public class MyFirebaseInstanceIDService extends FirebaseInstanceIdService {

    private static final String TAG = "MyFirebaseIIDService";

    /**
     * Called if InstanceID token is updated. This may occur if the security of
     * the previous token had been compromised. Note that this is called when the InstanceID token
     * is initially generated so this is where you would retrieve the token.
     */
    // [START refresh_token]
    @Override
    public void onTokenRefresh() {
        // Get updated InstanceID token.
        String refreshedToken = FirebaseInstanceId.getInstance().getToken();
        Log.d(TAG, "Refreshed token: " + refreshedToken);

        // If you want to send messages to this application instance or
        // manage this apps subscriptions on the server side, send the
        // Instance ID token to your app server.
        sendRegistrationToServer(refreshedToken);
    }
    // [END refresh_token]

    /**
     * Persist token to third-party servers.
     *
     * Modify this method to associate the user's FCM InstanceID token with any server-side account
     * maintained by your application.
     *
     * @param token The new token.
     */
    private void sendRegistrationToServer(String token) {
        // TODO: Implement this method to send token to your app server.
    }
}
package XXXX は自分のプロジェクトのパッケージを指定します
onTokenRefresh() が通知用のトークンを取得した時のメソッド
sendRegistrationToServer() にトークンをサーバへ保存する処理を書きます。
MyFirebaseMessagingService.java
/**
 * Copyright 2016 Google Inc. All Rights Reserved.
 *
 * Licensed under the Apache License, Version 2.0 (the "License");
 * you may not use this file except in compliance with the License.
 * You may obtain a copy of the License at
 *
 * http://www.apache.org/licenses/LICENSE-2.0
 *
 * Unless required by applicable law or agreed to in writing, software
 * distributed under the License is distributed on an "AS IS" BASIS,
 * WITHOUT WARRANTIES OR CONDITIONS OF ANY KIND, either express or implied.
 * See the License for the specific language governing permissions and
 * limitations under the License.
 */

package com.google.firebase.quickstart.fcm;

import android.app.NotificationManager;
import android.app.PendingIntent;
import android.content.Context;
import android.content.Intent;
import android.media.RingtoneManager;
import android.net.Uri;
import android.support.v4.app.NotificationCompat;
import android.util.Log;

import com.google.firebase.messaging.FirebaseMessagingService;
import com.google.firebase.messaging.RemoteMessage;

public class MyFirebaseMessagingService extends FirebaseMessagingService {

    private static final String TAG = "MyFirebaseMsgService";

    /**
     * Called when message is received.
     *
     * @param remoteMessage Object representing the message received from Firebase Cloud Messaging.
     */
    // [START receive_message]
    @Override
    public void onMessageReceived(RemoteMessage remoteMessage) {
        // [START_EXCLUDE]
        // There are two types of messages data messages and notification messages. Data messages are handled
        // here in onMessageReceived whether the app is in the foreground or background. Data messages are the type
        // traditionally used with GCM. Notification messages are only received here in onMessageReceived when the app
        // is in the foreground. When the app is in the background an automatically generated notification is displayed.
        // When the user taps on the notification they are returned to the app. Messages containing both notification
        // and data payloads are treated as notification messages. The Firebase console always sends notification
        // messages. For more see: https://firebase.google.com/docs/cloud-messaging/concept-options
        // [END_EXCLUDE]

        // TODO(developer): Handle FCM messages here.
        // Not getting messages here? See why this may be: https://goo.gl/39bRNJ
        Log.d(TAG, "From: " + remoteMessage.getFrom());

        // Check if message contains a data payload.
        if (remoteMessage.getData().size() > 0) {
            Log.d(TAG, "Message data payload: " + remoteMessage.getData());
        }

        // Check if message contains a notification payload.
        if (remoteMessage.getNotification() != null) {
            Log.d(TAG, "Message Notification Body: " + remoteMessage.getNotification().getBody());
        }

        // Also if you intend on generating your own notifications as a result of a received FCM
        // message, here is where that should be initiated. See sendNotification method below.
    }
    // [END receive_message]

    /**
     * Create and show a simple notification containing the received FCM message.
     *
     * @param messageBody FCM message body received.
     */
    private void sendNotification(String messageBody) {
        Intent intent = new Intent(this, MainActivity.class);
        intent.addFlags(Intent.FLAG_ACTIVITY_CLEAR_TOP);
        PendingIntent pendingIntent = PendingIntent.getActivity(this, 0 /* Request code */, intent,
                PendingIntent.FLAG_ONE_SHOT);

        Uri defaultSoundUri= RingtoneManager.getDefaultUri(RingtoneManager.TYPE_NOTIFICATION);
        NotificationCompat.Builder notificationBuilder = new NotificationCompat.Builder(this)
                .setSmallIcon(R.drawable.ic_stat_ic_notification)
                .setContentTitle("FCM Message")
                .setContentText(messageBody)
                .setAutoCancel(true)
                .setSound(defaultSoundUri)
                .setContentIntent(pendingIntent);

        NotificationManager notificationManager =
                (NotificationManager) getSystemService(Context.NOTIFICATION_SERVICE);

        notificationManager.notify(0 /* ID of notification */, notificationBuilder.build());
    }
}
onMessageReceived はアプリがフォアグラウンドにあるときに通知があったら呼び出されます。
AndroidManifest.xml のapplicationタグ直下に以下を追記
<service
    android:name=".MyFirebaseMessagingService">
    <intent-filter>
        <action android:name="com.google.firebase.MESSAGING_EVENT"/>
    </intent-filter>
</service>
<service
    android:name=".MyFirebaseInstanceIDService">
    <intent-filter>
        <action android:name="com.google.firebase.INSTANCE_ID_EVENT"/>
    </intent-filter>
</service>
これだけで通知の受信が可能です。
トピックを追加する場合
FirebaseMessaging.getInstance().subscribeToTopic("topicName");
で可能です。詳細はドキュメントを参照のこと。
通知を試してみます。
https://console.firebase.google.com
へアクセスしてプロジェクトへ移動します
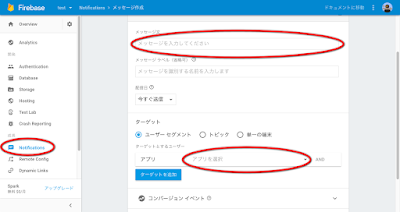
Notifications タブをクリックして新しいメッセージ
メッセージ文を入力して
ターゲットに対象のアプリを選択します
メッセージを送信をクリックするとアプリがバックグラウンドにある時通知が表示されます。
トークンが変わるタイミングでonTokenRefreshが呼び出されるので特定の端末に対して通知を保持する場合は何かしらの仕組みを用意する必要があります。
その他参考
Android * Firebase(GCM)でバックグラウンドから受け取った通知を処理する